Walk the site in a headset, with live status on every asset.
Open the project in a Quest browser, move through the 3D model, read each asset's status, and write comments and status back from inside VR.
What do you want to do?
Jump straight to the answer
What the VR walkthrough is
The 🥽 VR button in the 3D BIM Viewer opens the same project as an immersive walkthrough in a VR headset, at true real-world scale. It shows exactly what the desktop viewer shows — the assets on their platforms, the commissioning colours, the schedule played back day by day — and it reads the same live numbers the office reads in the Management View and the BIM Status Report. Every figure in the headset is produced by the same functions as on the desktop, so the headset can never disagree with the office.
The walkthrough is first of all for looking and understanding. Two narrow kinds of writing are possible from the headset (see Comments and status from VR): a comment on an issue, and an issue's status. There is no Tracker, no checklist ticking, no sign-off, no scheduling and no placement editing in the headset, by design — those stay on the desktop and the phone.
Getting in
Nothing is detected or switched automatically (unlike the mobile field interface). You open the app in the headset's own browser — on a Meta Quest, the built-in Quest Browser — at the normal HTTPS address, sign in as usual, open the project and its 3D View, and press 🥽 VR. The button only enables where that browser can actually start a VR session, and the browser then asks once for permission to enter immersive mode. A PC-tethered headset (Oculus Link / SteamVR) works the same way from desktop Chrome or Edge on that PC. On any other desktop browser the button stays disabled and its tooltip says why; that is expected, not a fault.
/vr-probe.html on the headset's browser once (the same site address followed by /vr-probe.html) and note what it reports: whether the browser supports immersive VR, speech recognition, speech synthesis and the microphone, with buttons to try each. Record the answers in the project notes — they decide whether the Speak button in the comment composer will work on that headset.Moving around
| Control | What it does |
|---|---|
| Right thumbstick forward, release | Teleport: an arc lands on the floor where you point; releasing the stick moves you there. |
| Right thumbstick sideways | Turn in steps. |
| Left thumbstick | Walk smoothly at walking pace in the direction you look — comfortable for short distances; teleport for long ones. Walking into a platform's footprint steps you up onto its deck, and walking off brings you back down, as if by stairs. |
| Trigger on a thing | Press: selects an asset, presses a button on the menu or the board, takes a warp marker. |
| A or X | Put the hand-held menu away, and bring it back in front of you wherever you are. |
| B or Y | The same for the site board. |
The controller's ray is a thick cyan laser with a ring where it lands; both are drawn on top of everything so they can never hide behind a box or a board. Rooms are not pick targets in VR (their translucent volumes would otherwise catch the laser meant for the equipment inside them); to inspect a room, select it on the desktop.
Getting to and from the platforms
If the project has one or more elevated platforms, each one's top surface becomes a normal teleport floor once you are standing on it — aim-and-release with the thumbstick works there exactly like on the ground, and the left stick walks you on and off a deck. For jumping between levels from a distance, platforms link together, and to the ground, in a single height-ordered chain: ground ↔ lowest platform ↔ next platform ↔ … ↔ highest platform. Every consecutive pair in that chain gets its own two small coloured disc markers at the same spot: a blue one at the lower level, an amber one at the upper level. Point the laser at either marker and pull the trigger (or click, in the desktop preview) and you are moved straight to the other one — an instant jump. There is no direct warp from the ground straight to a higher platform: reaching the third platform means warping through the first and second in sequence, same as climbing real floors.
Platform decks, floors and warp markers follow the project live: if a platform is added, resized, removed or has its height changed on the desktop while you are in the headset, the floors and the chain are re-synced within half a second.
Selecting an asset: the info card
Point the laser at any asset and pull the trigger to select it. A read-only info card stands beside it, on your right at eye height, with the asset's equipment type, current stage, per-stage sign-off dates, whether it is available on site, which party completed its last stage and which is responsible for the next one, and open issues by severity. Below those rows the card shows one line of stage bars, one per stage the asset has to pass (waived stages are not shown) — for each, its checklist completion (blue) and documentation completion (violet) side by side, with the percentages underneath (signed off once complete) — followed by up to five blocker lines: what currently prevents the next stage's sign-off, listed the way the Tracker would refuse it (Doc: … for a required document not yet completed, Failed: … for a checklist item marked Fail, and the gate reason itself — the previous stage not signed off, open critical issues, or an upstream chain not commissioned). A fully commissioned asset says so instead.
Selecting also opens the Selected tab on the hand-held menu (issues, checklists, documentation) and switches the site board to its own Selected tab — the same card in board-sized text.
Live status badges
Every asset carries a small floating badge above it while you are in VR (and in the desktop preview). Reading it top to bottom: the coloured strip along the top is the asset's current commissioning stage in the same colours as the By Stage legend (while the Timeline is on it follows the timeline colour of that day instead, and the badge says as of that day); the asset name; one mini bar per stage this asset has to pass, in order (L1…L4, or DQ…PQ in a datacenter project), each filled by that stage's checklist completion percentage — a bar with a green outline is a stage already signed off. A waived stage (the project-wide final-stage waiver, or the asset's own Final Stage Not Required) is simply not shown, so an asset with L3 and L4 waived carries two bars and is fully commissioned once L2 is signed off. A red pip in the top-right corner with a number means that many open critical issues, an amber pip means open high-severity issues (no pip: nothing critical or high); the bottom line is the responsible party for the next stage this asset is working toward.
Badges grow with distance so they stay readable across the site, are read-only and are not pick targets — pointing at one still selects the asset beneath it. Badges further than 25 m from you are hidden automatically so the view stays clean and the headset stays fast; walk closer and they appear. The Badges: ON button on the Walkthrough tab hides them all (press again to bring them back); they are on by default each time you enter VR. A checklist result or document ticked on the desktop or a phone shows on the badge within seconds.
The hand-held menu
A floating menu appears in front of you on entry, hanging below your eye line and tilted up toward you so the site stays visible over it. It holds its place while you look around and always turns to face you; take a couple of steps away from it, or turn away from it, and it glides after you to its usual spot. Press A or X on either controller to put it away, and again to bring it back in front of you wherever you are. Point and pull the trigger to press its buttons. It has up to three tabs:
- Walkthrough — By Type / By Stage colouring (the same colours as the desktop viewer, with the commissioning-status legend shown alongside), the Timeline (turn it on and grab the slider to scrub the saved schedule day by day, with Prev day / Play / Next day and the date shown — exactly the desktop 🎞️ Playback, driven from the headset; if the project has no saved schedule yet, the menu says so), Badges, Perf (see below) and Board, which brings the site board back in front of you.
- Management — the Management View on six pages: Overview, Gates, Milestones, Commercial, Issues and BIM Report. See the Management View manual, "In the VR walkthrough", for what each page holds. Long lists page with ◀ ▶. The Issues page is the whole project's issue list, most severe first, with Open / All and All assets · Project-level · Selected asset filters — the same filter as the desktop Issues window; project-level issues show as Project with the assets they tag. Tap a row and you get the same detail page as from the Selected tab: description, photos, comments, and the write row below (see Comments and status from VR).
- Selected — appears once an asset is selected: its Issues (tap one for its description, photos, comments — and the write row, see below), its Checklists (every stage's checklist, each item with its result) and its Docs (the documentation requirements with their completion). Photos attached to an issue open full-width on the menu, paged with ◀ ▶.
Both tabs end with Recenter on site (teleports you back to the centre) and Exit VR. Removing the headset or pressing Exit returns to the normal desktop viewer, with the timeline switched off and the live colours restored.
The site board
Besides the hand-held menu, a 5 m-wide board hangs 4 m in front of you when you enter VR, above head height and tilted down toward you like a stadium screen, so the site stays in view beneath it — the room-scale version of the Management numbers, readable from where you stand. Its left column shows the big numbers: health score, gates released / total, assets awaiting release, critical issues open and the handover readiness colour (green / amber / red, with checklist and documentation completion) — the same figures as the desktop Management View and BIM Status Report at that moment.
Its right half has tabs: Blockers lists the assets most in the way — sorted by open critical issues, then failed checklist items, then the lowest checklist completion of the next stage — each with its current stage, its first blocker and red/amber pips for open critical/high issues; Gates lists the unreleased business gates, highest risk first, with their phase; Assets lists every asset alphabetically; Activity lists the newest entries of the project's audit trail — who did what, when — refreshed every 15 seconds while the tab is open, with Dirac's one-line commentary above it; Selected appears whenever an asset is selected and shows its card in board-sized text. Every Blockers and Assets row is a button: point at it and pull the trigger to teleport to that asset — you land two metres from it, facing it, on the ground or on its platform deck; the asset is selected, its glow pulses for three seconds, its info card opens, and both the hand-held menu and the board are re-placed in front of you.
The board holds its place while you look around and always faces you; walk away from it or turn away and it glides after you; every teleport brings it along. Press B or Y on either controller, the Board button on the Walkthrough tab, or Hide on the board itself, to put it away or bring it back. Its bottom row repeats Recenter, Badges and Exit VR. The board also appears in the desktop preview (press Board there); clicking a Blockers row then simply selects that asset.
Time scrub on the board
The board's bottom strip is the schedule timeline at room scale: a 1.8 m slider with a tick every 30 days and the first and last dates under its ends, the date being shown, and the counter Assets complete: n / m — how many assets have finished their final stage by that day according to the saved plan. Grab the thumb with the trigger and drag to scrub: the whole site recolours as you move (the boxes and the badges together), the date and the counter follow the thumb. ▶ Play advances one day every 0.4 s and stops at the last day (press again to pause); −7 days / +7 days jump a week. Using any of them switches the timeline on by itself — the Walkthrough tab's Timeline toggle and slider show the same day, and turning the timeline off there restores the live colours. Without a saved schedule the strip says No schedule yet — build one in the Scheduler and its controls are disabled. Leaving VR returns the desktop Playback to the same day and switches it off.
Comments and status from VR
The headset can write two things, both from an issue's detail page (hand-held menu → Selected → Issues → tap an issue, or Management → Issues → tap any issue of the project, project-level ones included). The page shows the issue's description, its photos and the last three comments — the same comments the desktop Issue activity feed shows, who wrote each and when — and, along its bottom, the write row.
Commenting
Press 💬 Comment. The menu turns into a composer: the draft at the top, a row of quick phrases (Checked on site · Not found on site · Needs attention · Fixed – please verify · Blocked) that each add a whole line with one trigger pull, and a four-row keyboard (digits, letters, ⌫ backspace, ⇧ one-shot shift — the first letter of a comment is capitalised for you) with Space and ✕ Clear beneath — Clear wipes the whole draft (and the tags) in one press, and holding the trigger on ⌫ deletes continuously until you let go. Point at a key and pull the trigger; the keys are large enough to hit reliably at arm's length, but typing a sentence this way is slow — the quick phrases are there so that most walkdown notes are two presses. When the headset's browser offers speech recognition, a 🎤 Speak button appears: press it, say one sentence, and the words are added to the draft (the browser asks for the microphone the first time; if it says no, the composer tells you). Where the browser has no speech, the button is replaced by a note saying so. @ Tag swaps the keyboard for the list of project members: tick the people the note is for and they are emailed when you post — the same tagging (and the same email) as "ping" on the desktop issue feed; ⌨ Keyboard brings the keys back. Post saves it; ✕ Cancel throws the draft away. A comment is at most 280 characters.
A comment is stored as an entry of the project's audit trail, not as an edit of the project itself — it needs no save, cannot conflict with anyone else's work, and appears on the desktop issue's activity feed and on the site board's Activity tab within seconds. Anyone who can open the project in the headset can comment, including someone whose access is read-only.
Changing an issue's status
Next to 💬 Comment the row offers the next sensible status: an open issue can be set ▶ In progress or ✔ Resolved; one in progress can be ✔ Resolved or ↺ Reopened; a resolved one can be reopened. Every change asks once on a confirmation page — two trigger pulls on two different buttons, so a stray pull can never change an issue by itself. Closing an issue, and reopening a closed one, stay on the desktop: closing is the end of the CAPA record and is done after review, not from a walkdown. A status change is a real edit of the project — it is saved and merged like any desktop edit, shows on the badges and the board's Blockers list on the next refresh, and is logged in the issue's activity feed as a status change. Someone whose project access is read-only sees a note instead of the status buttons.
Live updates
An open project — on the desktop, in the 3D viewer and in the headset — follows what other people save to it without a reload: within a few seconds of a colleague's save (a checklist tick from a phone, a sign-off from the office) the asset colours, badges, the site board and the tracker reflect it. Your own unsaved edits are kept and merged; see the Permissions & Sharing manual, "Two people in the same project at the same time".
Seeing the VR menu without a headset
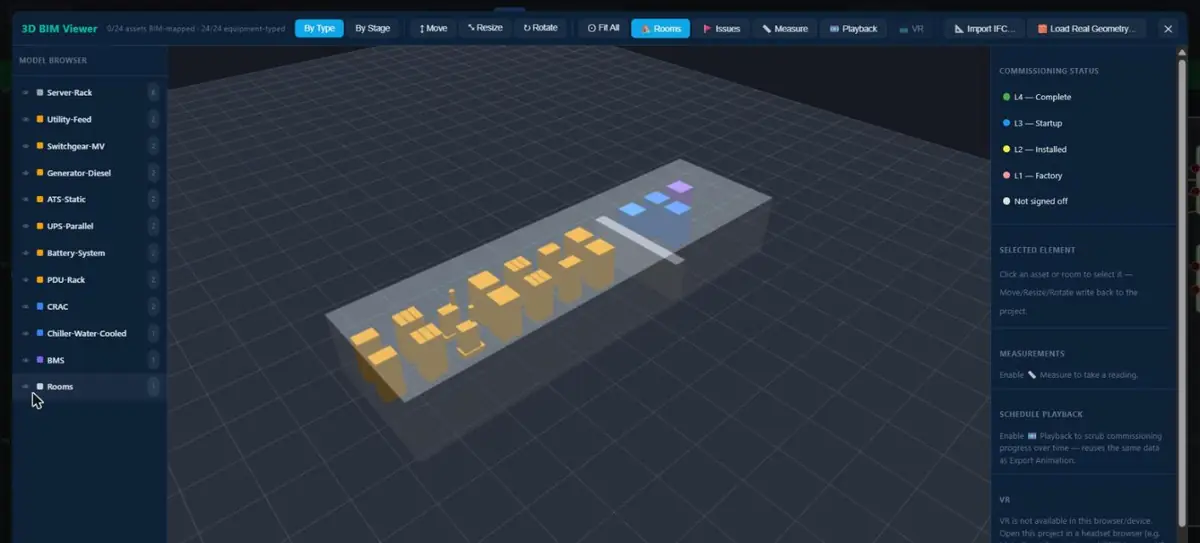 123
123- VR: enters the headset session (greyed out when no headset is found)
- Move, resize, rotate
- Stage legend shared with the headset board
In the desktop 3D viewer's right-hand panel, the VR section has 🥽 Preview VR menu on desktop (or Ctrl+Alt+V with the viewer open). It shows the exact in-headset menu, the site board and the info card of the selected asset here in the desktop scene, clickable with the mouse — useful for checking what a VR session offers, for preparing a demo before putting the headset on, and for trying the comment composer: everything on it works with a mouse, and a comment posted from the preview is a real comment.
Performance and the Perf readout
The Perf button on the Walkthrough tab (off by default) prints, next to the legend, the headset's current frame rate in Hz, the number of meshes being drawn and the JavaScript time spent per frame, refreshed twice a second. It is a diagnostic for checking that a large project still holds the headset's native frame rate (72 Hz on a Quest 3); it costs nothing while off and switches itself off when you leave VR. Assets of the same equipment type share their geometry, badges beyond 25 m are hidden, and connection lines are not drawn in 3D — these are what keep a large site smooth in the headset.
Troubleshooting
| What you see | What it means / what to do |
|---|---|
| The 🥽 VR button is disabled | This browser cannot start an immersive session. Open the site in the headset's own browser (or in Chrome/Edge on a PC tethered to the headset). The tooltip says which. |
| The browser refuses immersive mode | The site must be served over HTTPS and the browser's permission prompt must be accepted. Reload and press 🥽 VR again. |
| Standing inside a box, or below the deck | Press Recenter on site on the menu or the board, or teleport to an asset from the board's Blockers or Assets tab. |
| The menu or the board is out of sight | A/X brings the menu in front of you, B/Y the board; both also come along with every teleport. |
| The board reads "loading…" on the Activity tab | The first fetch of the audit trail is in flight; it refreshes every 15 seconds while the tab is open. |
| "No speech on this browser" in the composer | The browser has no speech recognition (or not inside an immersive session). Use the quick phrases and the keyboard; note the result of /vr-probe.html for this headset. |
| "Microphone not allowed" | The browser's microphone permission was declined for this site. Allow it in the headset browser's site settings and try Speak again. |
| "Could not post" | The comment did not reach the server — usually the headset lost its connection. The draft is kept; press Post again once the connection is back. |
| Frame rate below the headset's native rate | Turn Badges off, hide the board, or reduce the project (Hide Covered, Clear Geometry on the desktop). Press Perf to watch the numbers. |